

Every week we get asked if an object is able to be cast into epoxy resin, so we thought we write a blog to let you know what some of the most common objects can be cast into resin.
The list below will take you through some of the most popular objects, as with most creative endeavors there are always items that could work in epoxy resin that aren't on this list. If you are unsure then experiment with different objects yourself. Just be careful if they are sentimental objects, try on a similar object thats not sentimental before trying to cast your only precious object in resin.

Puzzle Pieces:
You can easily use Craft Resin’s epoxy resin over a puzzle. However you will want to secure it to a base before you do this or else the pieces could move around. To do this, you could cut a piece of MDF board to the same dimensions of your puzzle and stick your puzzle to the board with glue.
We would then recommend applying a sealant to your puzzle first before applying the epoxy resin, again the resin may soak into the puzzle and make it look darker, especially around the edge of each puzzle piece, you might like this look, it might work for your project, or it might not.
When you are covering something like a puzzle that has gaps in between each piece, you may need to apply more than one coat of epoxy resin. Air tends to be released between the puzzle pieces which then causes bubbles and when these disperse during the curing process they cause pitting. Applying another layer will even this out and fill in these pitted areas. Just make sure to sand down the first layer of resin you apply once it has cured, so then next layer bonds to the first.

Aluminium Objects:
Craft Resin’s epoxy resin will adhere to aluminium and works well on a number of different metals. You will however need to prep the surface of the metals before you apply the resin to it, this can be done by simply sanding the metals top layer first.
Jewellery:
Craft Resin’s epoxy resin can be used to create different jewellery pieces, for example, pendants, rings, earrings and bangles are all very popular jewellery makes that you can use Craft Resin to create. You can use molds to create these or pour the resin into bezels that will hold the resin in place and add a lovely edging to your jewellery pieces.
Fabric:
Craft Resin won't fully soak into the fabric, but it will still give it a wet look to it and will make the fabric stiff once it has fully cured. To see how this wet look may affect the colouring and your project, we would advise testing it out on the fabric of your choice first.

Polymer clay:
Craft Resin’s epoxy resin can be used over polymer clay. This can help to seal the sculpture in, help make the structure stronger and also give it a glossy look.
Once again cover polymer clay sculptures with epoxy resin with a paintbrush, getting into all the nooks and crannies to the artwork, building it up in layer. Unless your sculpture is small then these can be dipped into a mixing jug of Craft Resin.
Ceramics:
Some artists like to create their work on ceramic tiles for example, Craft Resin’s epoxy resin will bond to ceramic material. To cover ceramic tiles with epoxy resin simply pour it over the project and spread it as you normally would. If you are covering a bowl or a sculpture that's not flat you may want to paint the resin on with a paintbrush and build it up in layers.
If you're covering ceramic plates with Craft Resin, please make sure it has fully cured before serving food on it. Craft Resin is safe for use as a food contact surface.
Ceramics can also suffer from temperature shock issues, so make sure to warm ceramics before applying resin to them. You can do this by placing them on a heat mat for a short while before pouring. Ceramics can be a lot cooler than the workspace temperature, when warm resin mix is applied to the cool surface it can shrink back, ripple or create cracks in the project. Warming the ceramics first will stop this from happening.

Ashes:
Ashes are another item that has become popular to cast into epoxy resin in recent years, again the epoxy resin will enable you to cast the ashes and be able to cherish them forever. Many people cast pet ashes or ashes of their loved ones too.
Please once again before you begin, learn the techniques to do this and practice on something less sentimental till you have the techniques perfected. Sand can act a lot like ashes will in resin so please try it with something like sand first.
Ashes are light and so can move around a lot in epoxy resin when it is still in its liquid form, if you pour epoxy resin on top of ashes these may disperse them and make what was a condensed area of ashes look more sparse. Please take this into consideration, sometimes where the ashes move may look great, but sometimes it may not so it’s just something to note.
Before you start you can prepare your ashes so they don’t move too much. You can add your ash into a small mold in the shape that you’d like it to be and then add a small amount of resin to it, mix the ashes into it a bit and then leave that to cure for 24 hours. You can then add this into a larger resin project to encase it perfectly whilst it stays in that shape. This is great if you want to use something like a heart shaped mold, you will have a perfectly formed resin/ash heart piece to add to your larger projects.
The other way you can add ash into your resin project is to add it at the mixing stage, simply mix the resin and hardener for about 4 minutes, then add in the ashes for the last minute of mixing. You can then pour these into your mold, but once again it may move slightly, but that could be the look you’d like to achieve.
Sometimes people add some glitter into the ashes too so that it gives it an extra sparkle and beautiful touch as ash itself can look quite dull, and more dull when the resin is added to it as if it was wet.
If you are creating memorial projects using ash for a customer, then please do speak to them in depth about what they would like the project to look like and also set their expectations with how it can look. It’s better to be transparent about how it can look different to their expectations as resin moves in different ways in the beginning, rather than when they see the project for the first time and seeing their disappointment. Once resin is hardened it cannot be undone, the ashes will not be removable!
We don’t have a YouTube video on adding ashes to resin just yet, but there are lots available if you add that into the search bar. Watch, learn, experiment, practice and then gift/sell your memorial projects!
Memorial projects using ashes can be so beautiful and each one as unique as the person or pet they represent, like this beautiful project created below by Mandie Dite who is one of our Facebook Community Group Members. It's such a beautiful tribute to one of her family members:

Hair:
Lots of people out there really love memorial projects created with their beloved pet hair, or to cast their babies lock of hair from their first hair cut etc. It can once again make a lovely personalised keepsake.
Hair can once again move around in liquid resin mix, so once again experiment and see using maybe a small cut off of your own hair before attempting to sell any resin hair creations. Hair is very similar to ashes in the respect that it can be a sentimental project so once again, learn more and then try it on hair that is less sentimental first.
The issue you can have when casting hair is that it can stick out of your project, so you might want to work in stages once again. Cast it in a smaller mold first in the shape you desire then add to a larger project, or add to a larger project in layers, cutting off any parts that stick out as you go.
Hair might again look slightly darker or like it has a wet look to it so again set the expectation of your customer if you are creating a project using hair for someone else.
You might not want to add any colourant or glitter to a project that includes hair as it can sometimes cover the hair itself too much and you lose the beautiful effect that you can get when adding hair into resin, sometimes it can shimmer on its own.
Again there are lots of how to videos available on YouTube for adding hair to epoxy resin projects so please do search more on there before you begin.
For some inspiration have a look at Forget Me Not Memories By C work below, in this image the two hearts have a lock of hair neatly placed in them alongside beautiful forget me not flowers and a touch of gold leaf:

Flowers:
Flowers can look extremely beautiful in epoxy resin creations, however please note that you cannot use fresh flowers for this, they will need to be dried out first. Fresh flowers will rot inside your epoxy resin over time, so they may not look as beautiful in a few weeks time.
We have lots of guidance about adding flowers to epoxy resin creations so please do your research before starting projects like these, especially if creating memorial/sentimental flower projects:
How To Add Flowers In Epoxy Resin Blog
How To Make Flower Coasters YouTube Video

Sand/Shells/Pebbles:
If you are creating beautiful beach epoxy resin creations then you may want to add in objects like sand, shells and pebbles to your creations. These can look extremely beautiful and very realistic as beach scenes once you add on the epoxy waves to them.
When using heavier objects like shells and pebbles please note that these will sink to the bottom of your creations if added into the resin mix when it’s still in liquid form. If you want these to stand out slightly or not sink to the bottom then you will need to allow the initial layer of epoxy resin below the shells to cure a bit first before adding on these weighted items.
We do have more guidance available to help you create beach themed resin projects:
How To Create Ocean Resin Art Blog
How To Create Ocean Waves Using Resin YouTube Video

Insects:
We are seeing a lot of creations encapsulating insects and things like butterflies into epoxy resin creations after the summer months, these can look really beautiful and can show off nature in a way that will last throughout the years.
We do however also get a lot of comments on posts sharing insects in resin from people who are very upset that an animal has been harmed in the making of their art. We know most of you will know this already, but we just want to make ourselves clear on this subject. If you are going to encapsulate an insect in your epoxy resin creations please do make sure they are dead before hand, please don’t harm any animals/insects to include in your projects.
You can also get really great replica animals/insects these days so you could even consider encapsulating a replica not the real thing into your artwork. Replica fish for example can look very realistic in a resin pond scene.
Wood:
Things like resin tables and resin chopping boards have become extremely popular over recent years, not only can you add resin onto wooden creations, but you can also cast wooden objects into resin too.
We have lots of information on creating wood/resin creations so make sure you take a look at the guidance on wood below:
Working With Wood & Epoxy Resin Blog

Glitter:
Adding objects like glitter into your projects can make them look incredibly beautiful and stand out. Glitter has the potential to make epoxy resin creations look more elegant and eye-catching.
Please once again note that glitters can move around in liquid epoxy resin and can also sink to the bottom of creations. So you will want to experiment with different glitters, different glitter colourings and also how they form and move around in your creations as they cure.
Beads:
Adding in something like beads to epoxy resin creations can work really well, our tip would be to invest in lots of different objects like beads, glitters etc and then play around with them to see how you like to use them and how they act in your different creations. Once again watch out for them sinking to the bottom of your creations.
Stickers:
You can also add things like stickers into your creations, depending on the paper that is used for the stickers it would probably be advisable to prime the stickers first with something like Mod Podge to make sure they don’t disintegrate with the resin getting on them. The priming will give it a protection that you can then pour the resin over without worry.
If you treat stickers like photos and use the guidance you would when casting photos then you shouldn’t go wrong.

Plastic Trinkets:
Epoxy resin is a form of plastic, but other plastics will bond to it (not silicone) so you can cast plastic trinkets and toys into resin also. If you have your Childs favourite car toy when they were younger or favourite action hero figurine then you could cast these in epoxy resin too and create a whole scene out of the objects if you wished to.
Epoxy resin pyramids are very popular and so maybe you could add objects like these in your pyramid creations.
Cutoffs From Other Resin Projects:
One great way to avoid wastage of cured epoxy resin is to use offcuts in other projects you create. If you let all your drips cure on a plastic table covering, and then chop them up into pieces once cured these can make beautiful additions to your new epoxy resin creations.
These can sometimes be known as Terrazzo Chips and we’ve been admiring @priscriptionresin who has been creating lots of beautiful and colourful projects using terrazzo chips. Visit her profile by clicking the image below to see more of her amazing work:

Crystals:
When you create beautiful resin geode creations then you might want to include objects like crystals in your work, these obviously can be very expensive, but so can geode artwork. You can make your won crystals out of epoxy resin to keep the cost down, especially when you are just starting out.
Nut wether you are using real or fake crystals you can certainly add they into epoxy resin. Because of the shape and colourings of crystals may artists like to leave them popping out of their geode artworks to give a great 3D effect to their art.
But you can also completely cover them in the resin too, just be careful with crystals that are a clear look to them as these won’t stand out in your work as much as coloured crystals would when encapsulating them.

Gold leaf:
Gold leaf like glitter can again give a really elegant look to your resin creations and can be added to the top of our projects and then coated with a layer of resin painted on them to seal it in, or again mixed into your creation into the liquid epoxy resin before curing.
Gold leaf can be quite fiddly to use and so this again may take some practice to perfect, however there are lots of videos available on YouTube which will show you how to do it successfully.
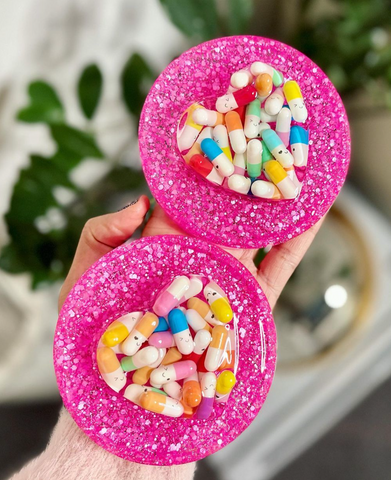
Pills:
This is a slightly out there object, but once again @prescritionresin has been inspiring us recently because they create with pills all the time and their projects look incredible. Now we wouldn’t suggest using your much needed medication on resin creations, but pills that are past their expiry date and would other wise be disposed of can be a great addition to some niche projects.
Click on the image below to be inspired yourself by some of @prescription_resin creations:
Coffee Beans:
Coffee beans can be another common object to be added into epoxy resin creations. It makes sense, if you’re creating coffee coasters then these tie in perfectly with what you’re making them for.
You don’t need to prime the coffee beans they will be ok mixed straight into the resin or the resin poured on top of them. These once again will sink to the bottom of the mold as they are heavier than the resin mix, so if you want them to sit above the bottom of the mold then place them in once the resin mix has started to harden slightly.

Food:
Now you may be thinking why would anyone waste food by putting it into epoxy resin, well we agree with you on that one! Lol. But people love creating different things and experiment with different mediums.
We did actually supply a fabulous artist @fuzzycomma with our resin for a special commissioned project they did with Chicago Town Pizza. You can see the project in the image below, for one of their Christmas campaigns they were asked to cast pizzas in epoxy resin so they could hang them on the Christmas Tree and do a special photo shoot for it.
We did speak to Alison from Fuzzy Comma and she did report that the pizzas only lasted a couple of days for the shoot and she doesn't know if they have continued to last to this day.
As with anything like natural objects or food, they can rot inside cured epoxy resin. Although there have been reports of a Hotdog and Burger that have lasted cast in epoxy resin for years, maybe the more processed food groups could outlast the fresh ones (which doesn't make us want to run out for a hotdog or burger anytime soon!).

Materials will Craft Resin NOT stick to?
Craft Resin’s epoxy resin can be used on lots of materials as demonstrated above, however it doesn't stick well to a few items, for example, again not an exclusive list:
Disposable plastic paint sheeting
Plastic sandwich/shopping bags
Silicone molds, or anything silicone for that matter
The non-sticky side of shiny tape
This can be a great thing as Artists can use these materials to help mix, pour and clean up their resin without the need for single use items. For example you can easily use silicone mixing jugs to mix your resin, then simply leave any resin mix to cure in these jugs then fold them out and wipe off any excess resin ready to use them over again.
If you have experimented and have tried Craft Resin on other objects/materials and it's worked well, or not so well on them, please share your experiences in the comments below. There might be a really obscure and wonderful material we haven't thought of yet that may inspire others to use.
Topic Of The Week Giveaway:
We have attached a giveaway to these Topic Of The Week announcements on our Instagram platform, this is helping us to spread the knowledge of how to use epoxy resin further, but also enabling anyone who helps us share this information to win free resin and mica powders.

To enter the weekly giveaway please see the latest post pinned to the top of our Instagram feed and follow the instructions to enter:
Team Craft Resin

